Family Photo Repair
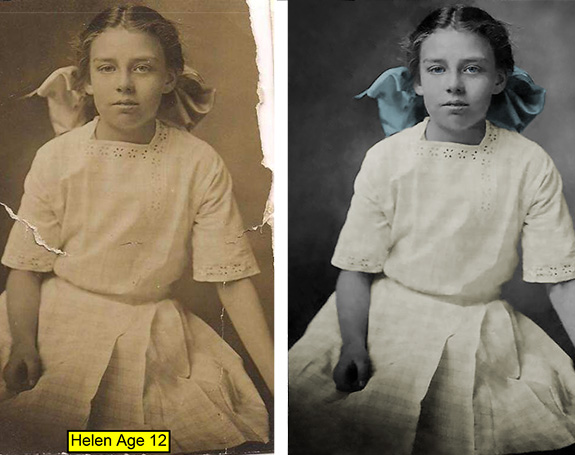
Using various Adobe Photoshop tools, a damaged family photograph of my Great Grandmother Helen, from the year 1915, was restored. This photo restoration began with an adjustment of Levels using the eyedropper tool for the blackest point to give the photo a good tonal range. Next, the image color was adjusted to black and white with a green filter. Cracks and tears in the photo were repaired with a combination of the Spot healing brush and the Healing brush. Ripped/missing edges were repaired and reconstructed with the Clone Stamp Tool and the Patch Tool. The most difficult repair was removing the name plaque and reconstructing the dress folds and pattern to mesh seamlessly with the original dress. It was challenging matching the shadows and folds while keeping some plaid fabric texture. I used the Marquee tool to select and hide the name plaque with a Layer Mask. I then used the Lasso Tool to select a similar dress section and by layer via copy arranged this over the reconstruction area. This method and a combination of the spot healing brush and changes in opacity slowly allowed the dress to look whole again. Finally I made an overlay layer at 50% grey to edit light and dark shades non-destructively in the reconstructed area. To finish up the repair part of restoration, I made the photo a Smart Object and then used Smart Sharpen to reduce noise and sharpen the image. Lastly, to colorize parts of the photo, selections were made with the Lasso Tool and then adjustment layers were made for Hue and Saturation. Changing Lightness and Opacity of the adjustment layers gave the finished photo a realistic vintage look.
